TikiPicker User Guide
This page is the reference for TikiPicker users. If you want to start using TikiPicker or you need assistance, please
send an email to tikipicker@thestechnology.com
Contents
TikiPicker Installation
The following are the requirements and installation instructions for end users, if you are an admin looking to install
the TikiPicker Outlook Add-in for your company, please contact us at tikipicker@thestechnology.com
Setting up a company account
First you need to setup a TikiPicker subscription. You can do this by sending an email to tikipicker@thestechnology.com.
To complete your subscription you will need:
- The data sets you would like to upload
- The list of users in your organisation you would like to grant access to. It is possible to customize the permission that each user has to access each data set.
Once the subscription is set up, your data sets will be uploaded to the database. Each user will receive an email from us with a link to activate the account. The fist time a new user logs in he will be asked to insert the date of birth and to choose a password.
At this point your company is onboaded and each user can log in and access the data sets.
Add-In Installation Inside Outlook
There are two ways to install the TikiPicker Outlook Add-in to your account
1. From the Outlook Store
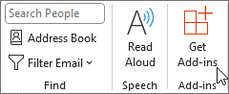
- Open Outlook and click on Get Add-ins button on your bar.
- Search for TikiPicker in the search bar, then click Add on the Thumbnail of TikiPicker App
- Click on My add-ins to Confirm the installation
2. From Microsoft Office Web Store
- Log on to Office.com using your credentials, then navigate to Outlook.
- Click on “Manage add-ins” under Settings (top right corner):
- Search for “Tikipicker"in Search Option, then click “Add” in the TikiPicker’s thumbnail:
- Click on My add-ins to Confirm the installations
Installation is complete! To confirm it worked, click on the and TikiPicker icon and log in. The data sets linked to your TikiPicker account will be ready for your search.
For additional details about generic installation of add-ins, please visit: https://support.office.com/en-us/article/get-an-office-add-in-for-outlook-1ee261f9-49bf-4ba6-b3e2-2ba7bcab64c8
TikiPicker Quick-Start
It is TikiEasy!
- Create a new message, or reply to an incoming mail.
- Inside the bar at the top, you can find a Button named TikiPicker. Click on it.

- Log in with your credentials you have previously created
- Search your items and click on
 to add the data in your email body

- Add additional info by browsing the details of the selected items

- You can also easily switch from one catalogue to any other ones you have access to.
Note: Tikipicker is enabled to work only in write mode, so it won’t be accessible unless you are actually writing an email.
Other details & Additional cool features
When you search for an item the lookup is performed matching the typed text with the first two columns of your data sets
You can easily change the third column visible in the right panel by just clicking on the column’s name.

You can easily sort the order in which you see the columns of a data set by just clicking  > Settings > Select the data set > Drag&Drop the columns’ names

If you want to reset your custom settings to the default ones, just click on > Reset to Default Settings
General Account Details
Depending on the settings of your work IT infrastructure, your account may be tied to you work account, so it might happen that only your company IT administrator can reset it for you.
Please, be aware that the password can be different form the one you use to access your work email.
Supported Outlook Clients and Exchange Servers
A standard modern outlook client is required. One of the followings is supported:
- Office Desktop Clients
- Outlook for Windows 2013 (Requires the KB3114349 Update)
- Outlook for Windows 2016
- Outlook for Mac 2016 (Minimum version requirement of 15.32)
- If the Office stable channel is still on version 15.31, then use the Fast Preview release channel to upgrade to at least 15.35. Fast Preview can be enabled in Help > Check for Updates > Join Office Insider Program
- Office Web Clients
- Google Chrome for macOS and Windows
- Mozilla Firefox for macOS and Windows
- Safari for Mac
- Internet Explorer
- Microsoft Edge
- Any JavaScript enabled browser
TikiPicker requires at least Microsoft Exchange 2013 to work.
TikiPicker Detailed Add-In Usage
Glossary
Data set: complete list of items.
Item: an individual article or unit composed by cells.
Detail: Named atomic element that composes an item.
Outlook Store: Market Hosted by Microsoft which holds approved Add-Ins.
Search Bar: Graphic component present in the main view where text can be specified to look for one or more items
Main View: Page that is shown when the add-in is loaded.
Login
- Click on at the left of the search bar.
- Click on the
 to log-in. A new window is going to be opened.
 - Insert your username and password in the login form.
Once you get a “Login Successful” message, close the window.
Now you are logged-in and you are able search for your items.
Search for an Item
- Log into TikiPicker by following the steps in login
- Click on the Search Bar
- Type part or the entire name of the item you want to look for
- If just one listing matches the research, then you will see the name of such a listing compare below the search-bar and all the results below, otherwise the name of the multiple listings that match the research will be shown below the search bar.
- If multiple listings match your research. Click on the button with the name of the listing that you want to see.
Quick-Add an Item to a message
- Log into TikiPicker by following the steps in login
- Search for an Item like in the steps described in search for an item
- Click on the at the right of the item you want to insert
- The 3 details shown in the table associated to the item you have selected are going to be inserted in the current message with the label associated to every detail.
- If you wish so, Edit the inserted text
See Additional Details of an Item
- Log into TikiPicker by following the steps in login
- Search for an Item like in the steps described in search for an item
- Click on
 to view all the details associated to an item
Add specific Additional Details of an Item to a message
- Repeat the steps present in See Additional Details of an Item
- Click on the circles at the left-side of the details you want to add to the message.
- Click the button to add the selected details to the current message
TikiPicker User Guide
This page is the reference for TikiPicker users. If you want to start using TikiPicker or you need assistance, please
send an email to tikipicker@thestechnology.com
Contents
TikiPicker Installation
The following are the requirements and installation instructions for end users, if you are an admin looking to install
the TikiPicker Outlook Add-in for your company, please contact us at tikipicker@thestechnology.com
Setting up a company account
First you need to setup a TikiPicker subscription. You can do this by sending an email to tikipicker@thestechnology.com.
To complete your subscription you will need:
Once the subscription is set up, your data sets will be uploaded to the database. Each user will receive an email from us with a link to activate the account. The fist time a new user logs in he will be asked to insert the date of birth and to choose a password.
At this point your company is onboaded and each user can log in and access the data sets.
Add-In Installation Inside Outlook
There are two ways to install the TikiPicker Outlook Add-in to your account
1. From the Outlook Store
2. From Microsoft Office Web Store
Installation is complete! To confirm it worked, click on the and TikiPicker icon and log in. The data sets linked to your TikiPicker account will be ready for your search.
For additional details about generic installation of add-ins, please visit: https://support.office.com/en-us/article/get-an-office-add-in-for-outlook-1ee261f9-49bf-4ba6-b3e2-2ba7bcab64c8
TikiPicker Quick-Start
It is TikiEasy!
Note: Tikipicker is enabled to work only in write mode, so it won’t be accessible unless you are actually writing an email.
Other details & Additional cool features
When you search for an item the lookup is performed matching the typed text with the first two columns of your data sets
You can easily change the third column visible in the right panel by just clicking on the column’s name.

You can easily sort the order in which you see the columns of a data set by just clicking > Settings > Select the data set > Drag&Drop the columns’ names

If you want to reset your custom settings to the default ones, just click on > Reset to Default Settings
General Account Details
Depending on the settings of your work IT infrastructure, your account may be tied to you work account, so it might happen that only your company IT administrator can reset it for you.
Please, be aware that the password can be different form the one you use to access your work email.
Supported Outlook Clients and Exchange Servers
A standard modern outlook client is required. One of the followings is supported:
TikiPicker requires at least Microsoft Exchange 2013 to work.
TikiPicker Detailed Add-In Usage
Glossary
Data set: complete list of items.
Item: an individual article or unit composed by cells.
Detail: Named atomic element that composes an item.
Outlook Store: Market Hosted by Microsoft which holds approved Add-Ins.
Search Bar: Graphic component present in the main view where text can be specified to look for one or more items
Main View: Page that is shown when the add-in is loaded.
Login
Once you get a “Login Successful” message, close the window.
Now you are logged-in and you are able search for your items.
Search for an Item
Quick-Add an Item to a message
See Additional Details of an Item
Add specific Additional Details of an Item to a message